
Create a Conversation Session
Conversation sessions are the lightest entry point in HagiCode. Pick a project, ask a question, and let an Agent read the repository and answer. You decide per session whether the Agent may modify files.
Prerequisites
Before you start a conversation session, make sure you have:
- completed any installation method (Microsoft Store or Desktop) by following the Installation Guide
- completed Wizard Setup, which creates your first Agent and at least one project
- selected that project on the session board
What is a conversation session for?
A conversation session works best when you want to understand first and edit later. Typical uses include:
- quickly analyzing an unfamiliar repository
- asking a focused question about one file, module, or error
- making a small change without planning it as a proposal
- attaching images, standard phrases, or earlier messages before sending
If your task has already moved from “understand the problem” to “plan, review, and archive a structured change,” continue with Create Proposal Session. This page only covers conversation sessions.
Workflow overview
| Stage | What you do | What happens |
|---|---|---|
| Create | Click Create Normal Session and describe what you want | The drawer collects the project, an optional title, the scope, and your first message |
| Start | Pick an Agent from Available Agents | The session starts immediately and appears in the Execution lane |
| Read | Open the session card | The Agent reads the repository and answers; a Session Complete card summarizes the run |
| Decide | Use the mode switch next to the message box | Stay in read-only mode, or turn on edit mode so the Agent may change files |
| Add context | Use the image, standard phrase, and history buttons | Your next message carries richer context |
Step 1: Create the session
Select your project, then click Create Normal Session (the speech-bubble icon) in the toolbar above the board.
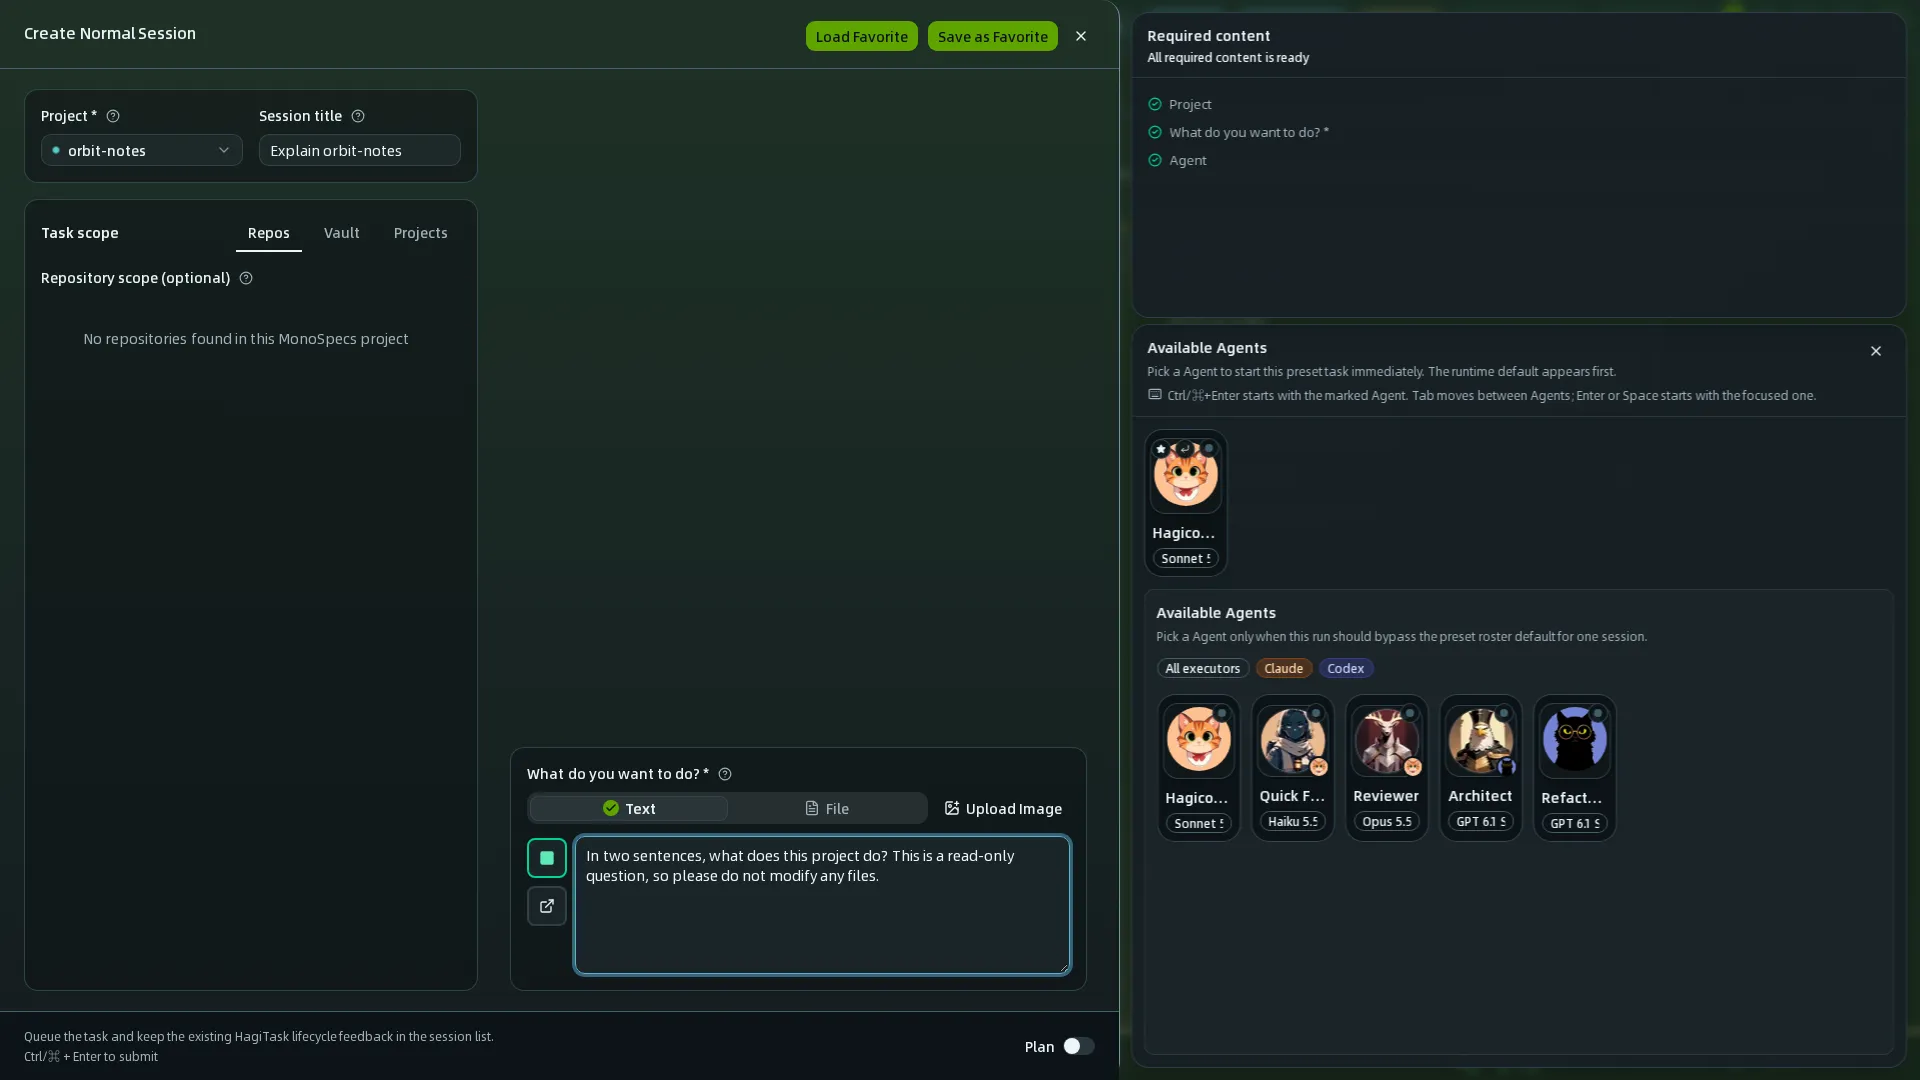
Fill in the drawer:
- Project (required) – defaults to the selected project.
- Session title – optional; it becomes the title of the card on the board.
- Task scope – optional. Repos narrows the session to repositories of a MonoSpecs project, while Vault and Projects attach extra reference material.
- What do you want to do? (required) – your first message. Upload Image attaches a picture.
The Available Agents panel opens next to the drawer. Click an Agent and the session starts immediately. The first card is the runtime default; the second list lets you pick a different Agent for this one run only. You can also press Ctrl/⌘ + Enter to submit from the keyboard.
Start with a question, not a change
A first message such as “In two sentences, what does this project do? Do not modify any files.” is a safe way to confirm that your Agent and project are wired up correctly.
Step 2: Read the result
The new session appears as a card in the Execution lane with a status badge. Click it to open the session.
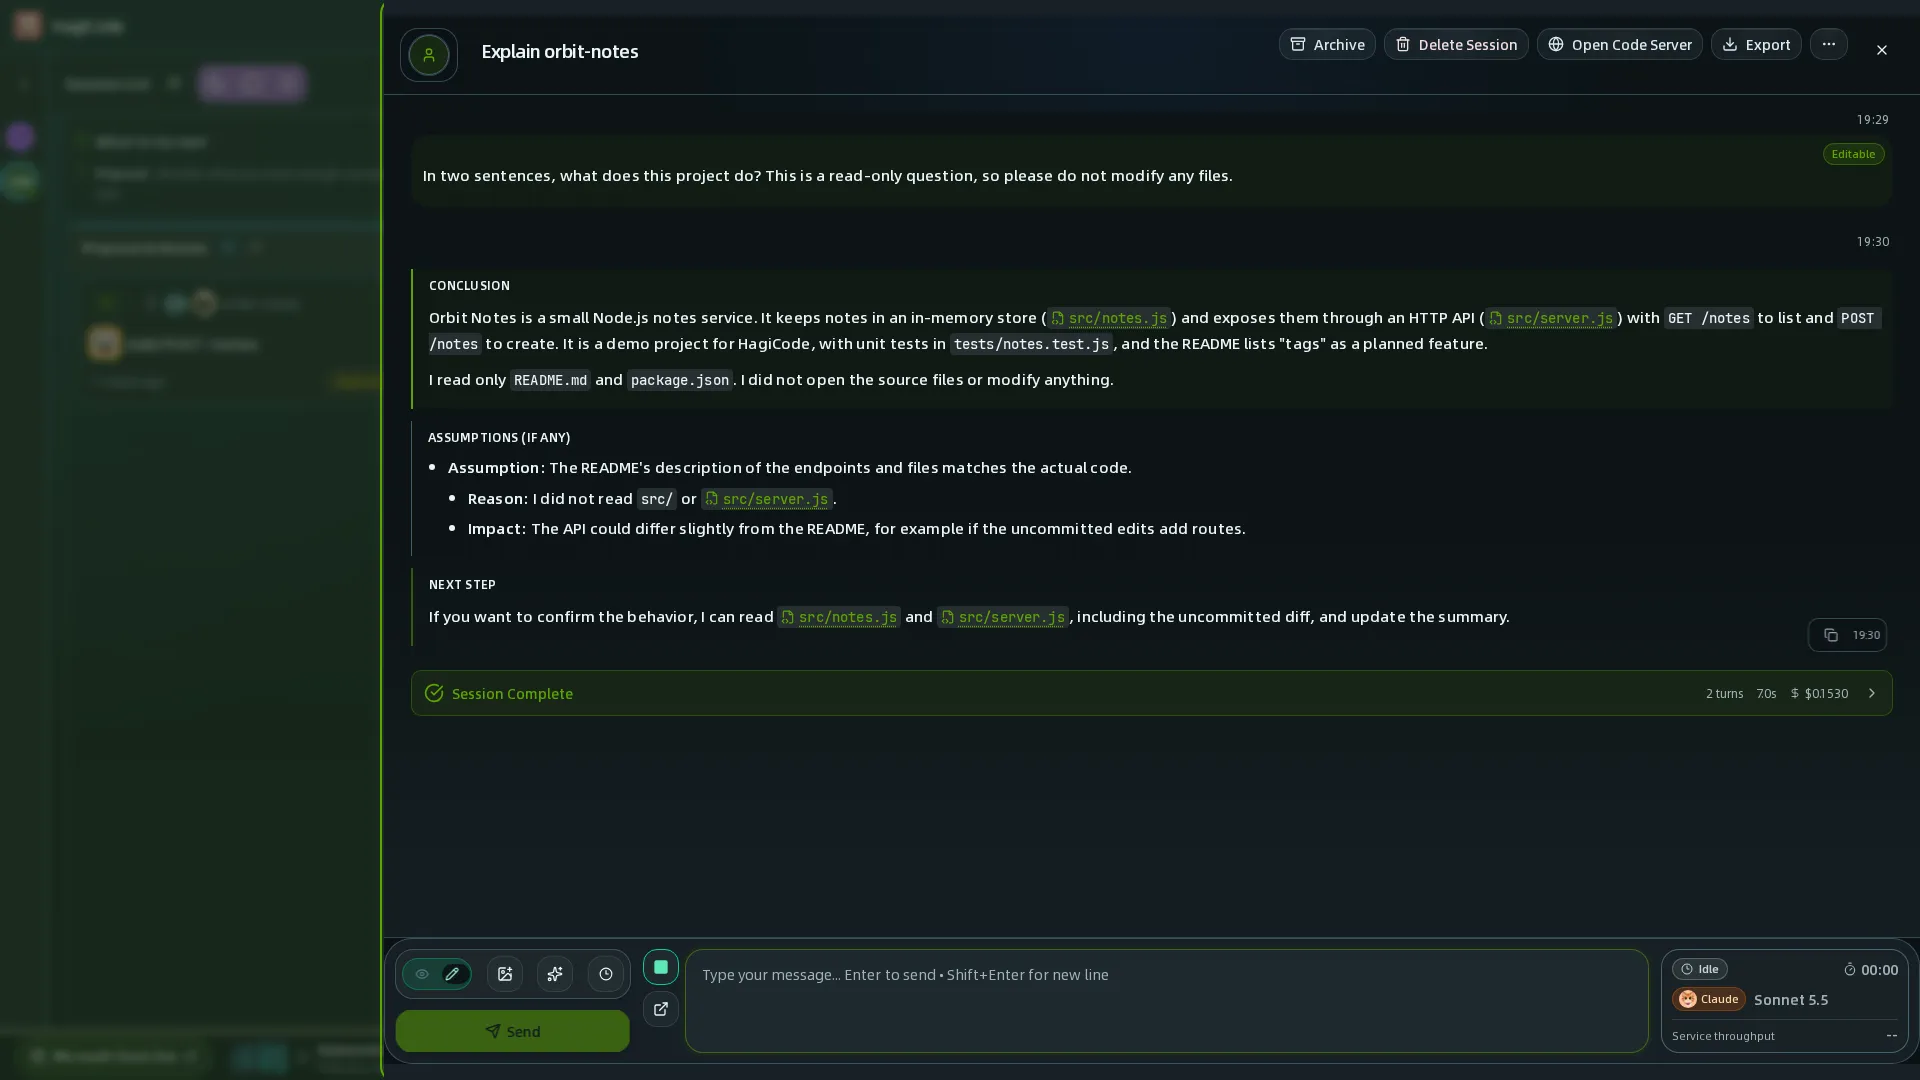
- The header shows the title and Agent, with Archive, Delete Session, Open Code Server, and a … menu.
- The conversation lists your message, the Agent’s tool calls as compact ledger rows, and its answer.
- A Session Complete card closes each run with the number of turns, the elapsed time, and the cost. Click it to expand the details.
- The Agent status card at the right of the message box shows the Agent CLI, the model, its state (for example Idle), and the elapsed time.
Type a follow-up in the message box. Press Enter to send and Shift + Enter for a new line.
Step 3: Choose read-only or edit mode
The switch at the left of the message box has two positions. The eye is read-only: the Agent can inspect and explain, but it does not change files. The pencil is edit mode: new messages are more likely to modify files or adjust the current implementation.


The mode applies to the session you are in, and you can change it between messages. Whether new normal sessions start in edit mode is controlled by Settings → Sessions and conversation → Chat View → Default to Edit Mode for Normal Chats. See Settings.
The safer pattern is simple: confirm the direction in read-only mode first, then switch to edit mode when you actually want changes.
Step 4: Add context before you send
Three buttons beside the mode switch add context to your next message:
- Insert an image attachment – attach a screenshot, error capture, or design reference. The image appears above the message box with its file name and size, and you can remove it with the × before sending.
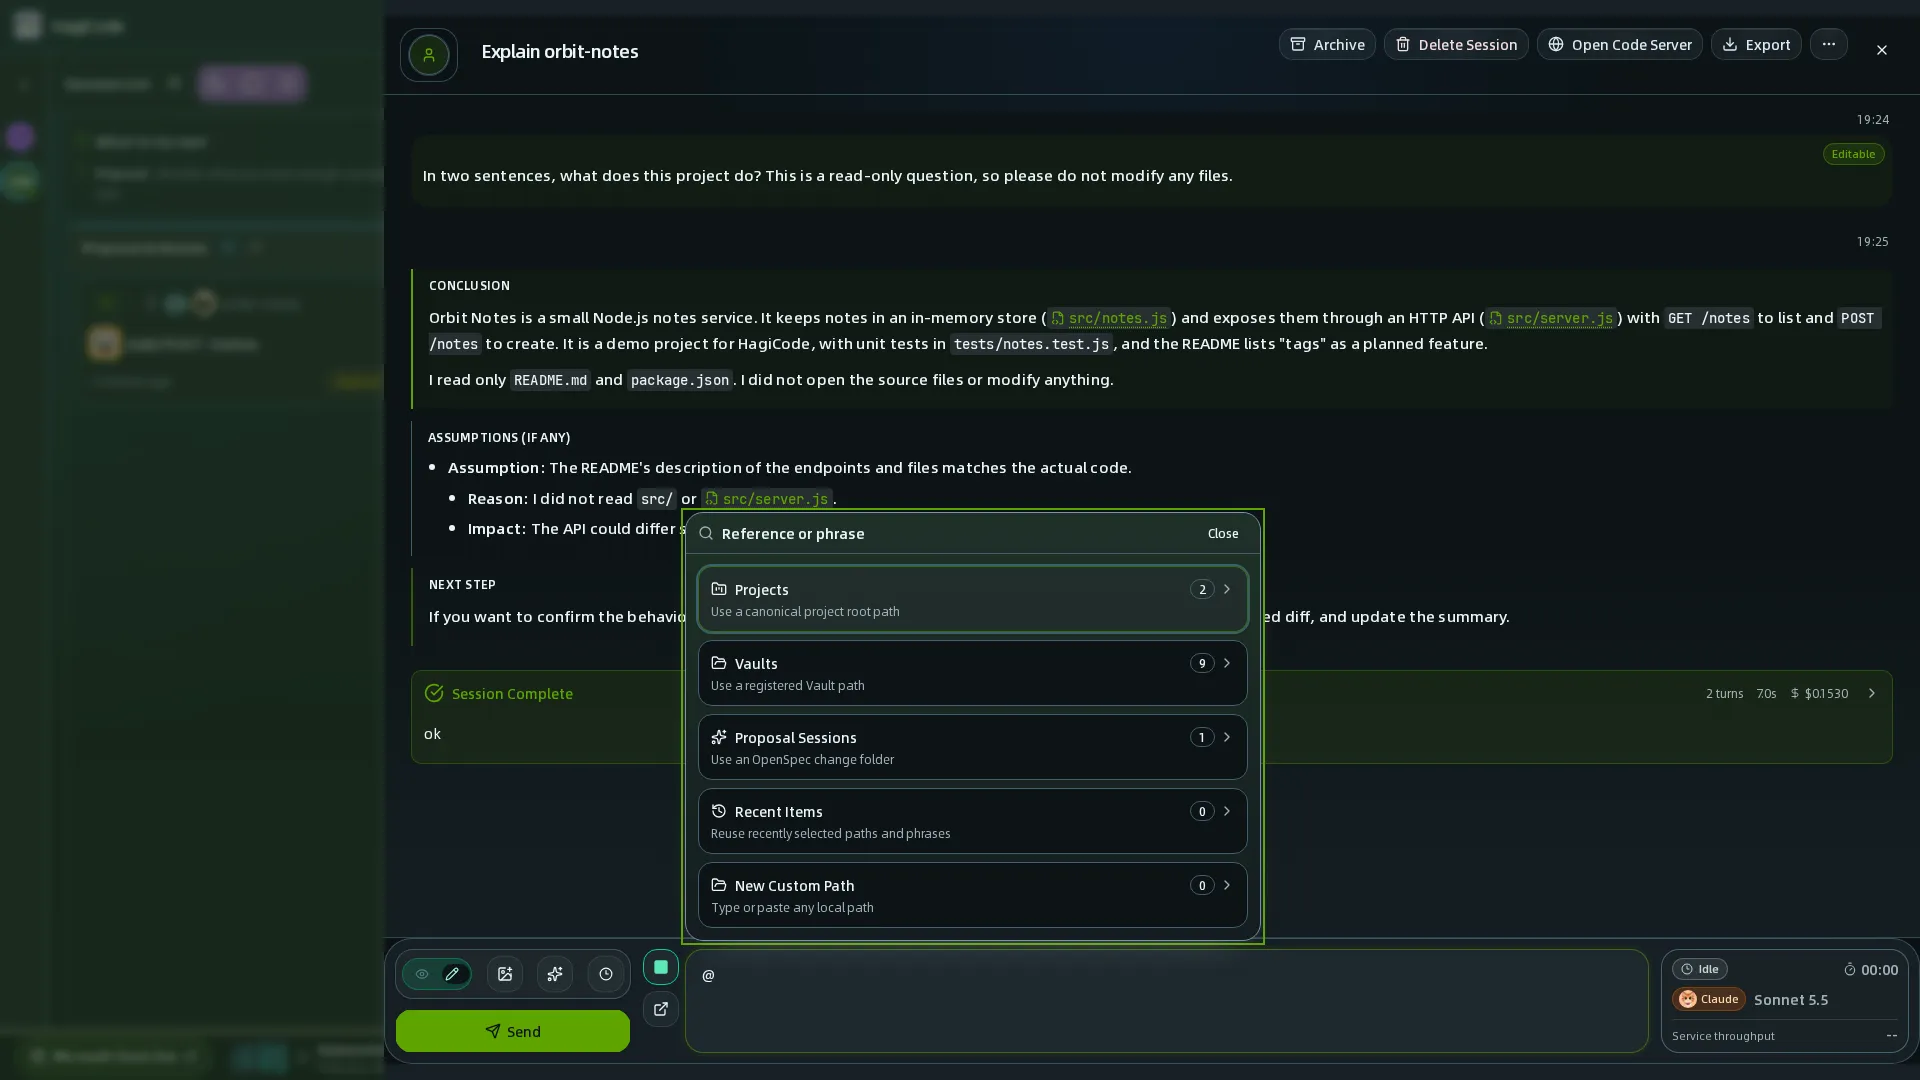
- Standard Phrases – inserts an
@reference. The picker offers Projects (a canonical project root path), Vaults (a registered vault path), Proposal Sessions (an OpenSpec change folder), and Recent Items. - Import Recent History – reuses one of the recent messages from this session so you do not have to type it again.

Images are useful when you want to:
- ask the Agent to explain an interface screenshot
- attach an error screenshot or design mockup and add follow-up instructions
- give visual context before switching to edit mode
Typical progression
- Create the session from the toolbar and pick an Agent.
- Start read-only with a question about the project.
- Read the answer, then ask follow-ups.
- Turn on edit mode only when direct file changes are needed.
- Add images, standard phrases, or history to give the next message more context.
- Archive the session when you are done, which moves it to the Archived lane.
If the task now needs planning, review, and archival discipline, continue with the proposal-session guide.
Next steps
HagiCode
HagiCode is an agentic coding workspace. Rich, convenient UI interactions make planning, agent execution, and project work approachable and easy to navigate, creating an engaging development experience.
Explore an engaging development experience through rich, convenient UI interactions.

- SmartOpenSpec workflows turn intent into an executable path, from proposal to design, tasks, and a shipped change.
- EfficientMulti-agent execution keeps research, implementation, and review moving in parallel, across several repositories and the Agent CLIs you already use.
- InterestingRich, convenient UI interactions make planning, agent execution, and project work approachable and easy to navigate.
Download for Windows
Share HagiCode

Turn ideas into shipped software.
HagiCode is an agentic coding workspace. OpenSpec workflows plan the change, multi-agent execution carries it out, and Hero Scenario makes the long run visible, so ideas become shipped software.
- Smart
- OpenSpec workflows turn intent into a path from proposal to shipped change.
- Efficient
- Multi-agent execution runs research, build, and review in parallel.
- Fun
- Rich UI interactions make planning, agent work, and projects easier to follow.
© 2026 HagiCode | Powered By hagilight-starlight@0.21.0 | Branch: main | Commit: 951128b | Built: