Progressive Disclosure: Improving Human-Computer Interaction in AI Products with the Less Is More Philosophy
Progressive Disclosure: Improving Human-Computer Interaction in AI Products with the “Less Is More” Philosophy
Section titled “Progressive Disclosure: Improving Human-Computer Interaction in AI Products with the “Less Is More” Philosophy”In AI product design, the quality of user input often determines the quality of the output. This article shares a “progressive disclosure” interaction approach we practiced in the HagiCode project. Through step-by-step guidance, intelligent completion, and instant feedback, it turns users’ brief and vague inputs into structured technical proposals, significantly improving human-computer interaction efficiency.
Background
Section titled “Background”Anyone building AI products has probably seen this situation: a user opens your app and enthusiastically types a one-line request, only for the AI to return something completely off target. It is not that the AI is not smart enough. The user simply did not provide enough information. Mind-reading is hard for anyone.
This issue became especially obvious while we were building HagiCode. HagiCode is an AI-driven coding assistant where users describe requirements in natural language to create technical proposals and sessions. In actual use, we found that user input often has these problems:
- Inconsistent input quality: some users type only a few words, such as “optimize login” or “fix bug”, without the necessary context
- Inconsistent technical terminology: different users use different terms for the same thing; some say “frontend” while others say “FE”
- Missing structured information: there is no project background, repository scope, or impact scope, even though these are critical details
- Repeated problems: the same types of requests appear again and again, and each time they need to be explained from scratch
The direct result is predictable: the AI has a harder time understanding the request, proposal quality becomes unstable, and the user experience suffers. Users think, “This AI is not very good,” while we feel unfairly blamed. If you give me only one sentence, how am I supposed to guess what you really want?
In truth, this is understandable. Even people need time to understand one another, and machines are no exception.
To solve these pain points, we made a bold decision: introduce the design principle of “progressive disclosure” to improve human-computer interaction. The changes this brought were probably larger than you would imagine. To be honest, we did not expect it to be this effective at the time.
About HagiCode
Section titled “About HagiCode”The approach shared in this article comes from our practical experience in the HagiCode project. HagiCode is an open-source AI coding assistant designed to help developers complete tasks such as code writing, technical proposal generation, and code review through natural language interaction. Project link: github.com/HagiCode-org/site.
We developed this progressive disclosure approach through multiple rounds of iteration and optimization during real product development. If you find it valuable, that at least suggests our engineering is doing something right. In that case, HagiCode itself may also be worth a look. Good tools are meant to be shared.
What Is Progressive Disclosure
Section titled “What Is Progressive Disclosure”“Progressive disclosure” is a design principle from the field of HCI (human-computer interaction). Its core idea is simple: do not show users all information and options at once. Instead, reveal only what is necessary step by step, based on the user’s actions and needs.
This principle is especially suitable for AI products because AI interaction is naturally progressive. The user says a little, the AI understands a little, then the user adds more, and the AI understands more. It is very similar to how people communicate with each other: understanding usually develops gradually.
In HagiCode’s scenario, we applied progressive disclosure in four areas:
1. Description optimization mechanism: let AI help you say things more clearly
Section titled “1. Description optimization mechanism: let AI help you say things more clearly”When a user enters a short description, we do not send it directly to the AI for interpretation. Instead, we first trigger a “description optimization” flow. The core of this flow is “structured output”: converting the user’s free text into a standard format. It is like stringing loose pearls into a necklace so everything becomes easier to understand.
The optimized description must include the following standard sections:
- Background: the problem background and context
- Analysis: technical analysis and reasoning
- Solution: the solution and implementation steps
- Practice: concrete code examples and notes
At the same time, we automatically generate a Markdown table showing information such as the target repository, paths, and edit permissions, making subsequent AI operations easier. A clear directory always makes things easier to find.
Here is the actual implementation:
// Core method in ProposalDescriptionMemoryService.cspublic async Task<string> OptimizeDescriptionAsync(    string title,    string description,    string locale = "zh-CN",    DescriptionOptimizationMemoryContext? memoryContext = null,    CancellationToken cancellationToken = default){    // Build query parameters    var queryContext = BuildQueryContext(title, description);
    // Retrieve historical context    var memoryContext = await RetrieveHistoricalContextAsync(queryContext, cancellationToken);
    // Generate a structured prompt    var prompt = await BuildOptimizationPromptAsync(        title,        description,        memoryContext,        cancellationToken);
    // Call AI for optimization    return await _aiService.CompleteAsync(prompt, cancellationToken);}
The key to this flow is “memory injection”. We inject historical context such as project conventions, similar cases, and negative patterns into the prompt, allowing the AI to reference past experience during optimization. Experience should not go to waste.
Notes:
- Make sure the current input takes priority over historical memory, so explicitly specified user information is not overridden
- HagIndex references must be treated as factual sources and must not be altered by historical cases
- Low-confidence correction suggestions should not be injected as strong constraints
2. Voice input capability: speaking is more natural than typing
Section titled “2. Voice input capability: speaking is more natural than typing”In addition to text input, we also support voice input. This is especially useful for describing complex requirements. Typing a technical request can take minutes, while saying it out loud may take only a few dozen seconds.
The key design focus for voice input is “state management”. Users must clearly know what state the system is currently in. We defined the following states:
- Idle: the system is ready and recording can start
- Waiting upstream: the system is connecting to the backend service
- Recording: the user’s voice is being recorded
- Processing: speech is being converted to text
- Error: an error occurred and needs user attention
The frontend state model looks roughly like this:
interface VoiceInputState {  status: 'idle' | 'waiting-upstream' | 'recording' | 'processing' | 'error';  duration: number;  error?: string;  deletedSet: Set<string>; // Fingerprint set of deleted results}
// State transition when recording startsconst handleVoiceInputStart = async () => {  // Enter waiting state first and show a loading animation  setState({ status: 'waiting-upstream' });
  // Wait for backend readiness confirmation  const isReady = await waitForBackendReady();  if (!isReady) {    setState({ status: 'error', error: 'Backend service is not ready' });    return;  }
  // Start recording  setState({ status: 'recording', startTime: Date.now() });};
// Handle recognition resultsconst handleRecognitionResult = (result: RecognitionResult) => {  const fingerprint = normalizeFingerprint(result.text);
  // Check whether it has already been deleted  if (state.deletedSet.has(fingerprint)) {    return; // Skip deleted content  }
  // Merge the result into the text box  appendResult(result);};
There is an important detail here: we use a “fingerprint set” to manage deletion synchronization. When speech recognition returns multiple results, users may delete some of them. We store the fingerprints of deleted content so that if the same content appears again later, it is skipped automatically. It is essentially a way to remember what the user has already rejected.
3. Prompt management system: externalize the AI’s “brain”
Section titled “3. Prompt management system: externalize the AI’s “brain””HagiCode has a flexible prompt management system in which all prompts are stored as files:
prompts/├── metadata/│ ├── optimize-description.zh-CN.json│ └── optimize-description.en-US.json└── templates/ ├── optimize-description.zh-CN.hbs └── optimize-description.en-US.hbsEach prompt consists of two parts:
- Metadata file (
.json): defines information such as the prompt scenario, version, and parameters - Template file (
.hbs): the actual prompt content, written with Handlebars syntax
The metadata file format looks like this:
{ "scenario": "optimize-description", "locale": "zh-CN", "version": "1.0.0", "syntax": "handlebars", "syntaxVersion": "1.0", "parameters": [ { "name": "title", "type": "string", "required": true, "description": "Proposal title" }, { "name": "description", "type": "string", "required": true, "description": "Original description" } ], "author": "HagiCode Team", "description": "Optimize the user's technical proposal description", "lastModified": "2026-04-05", "tags": ["optimization", "nlp"]}The template file uses Handlebars syntax and supports parameter injection:
You are a technical proposal expert.
<task>Generate a structured technical proposal description based on the following information.</task>
<input><title>{{title}}</title><description>{{description}}</description>{{#if memoryContext}}<memory_context>{{memoryContext}}</memory_context>{{/if}}</input>
<output_format>## Background[Describe the problem background and context, including project information, repository scope, and so on]
## Analysis[Provide the technical analysis and reasoning process, and explain why this change is needed]
## Solution[Provide the solution and implementation steps, listing the key code locations]
## Practice[Provide concrete code examples and notes]</output_format>
The benefits of this design are clear:
- prompts can be version-controlled just like code
- multiple languages are supported and can be switched automatically based on user preference
- the parameterized design allows context to be injected dynamically
- completeness can be validated at startup, avoiding runtime errors
If knowledge stays only in someone’s head, it is easy to lose. Recording it in a structured way from the beginning is much safer.
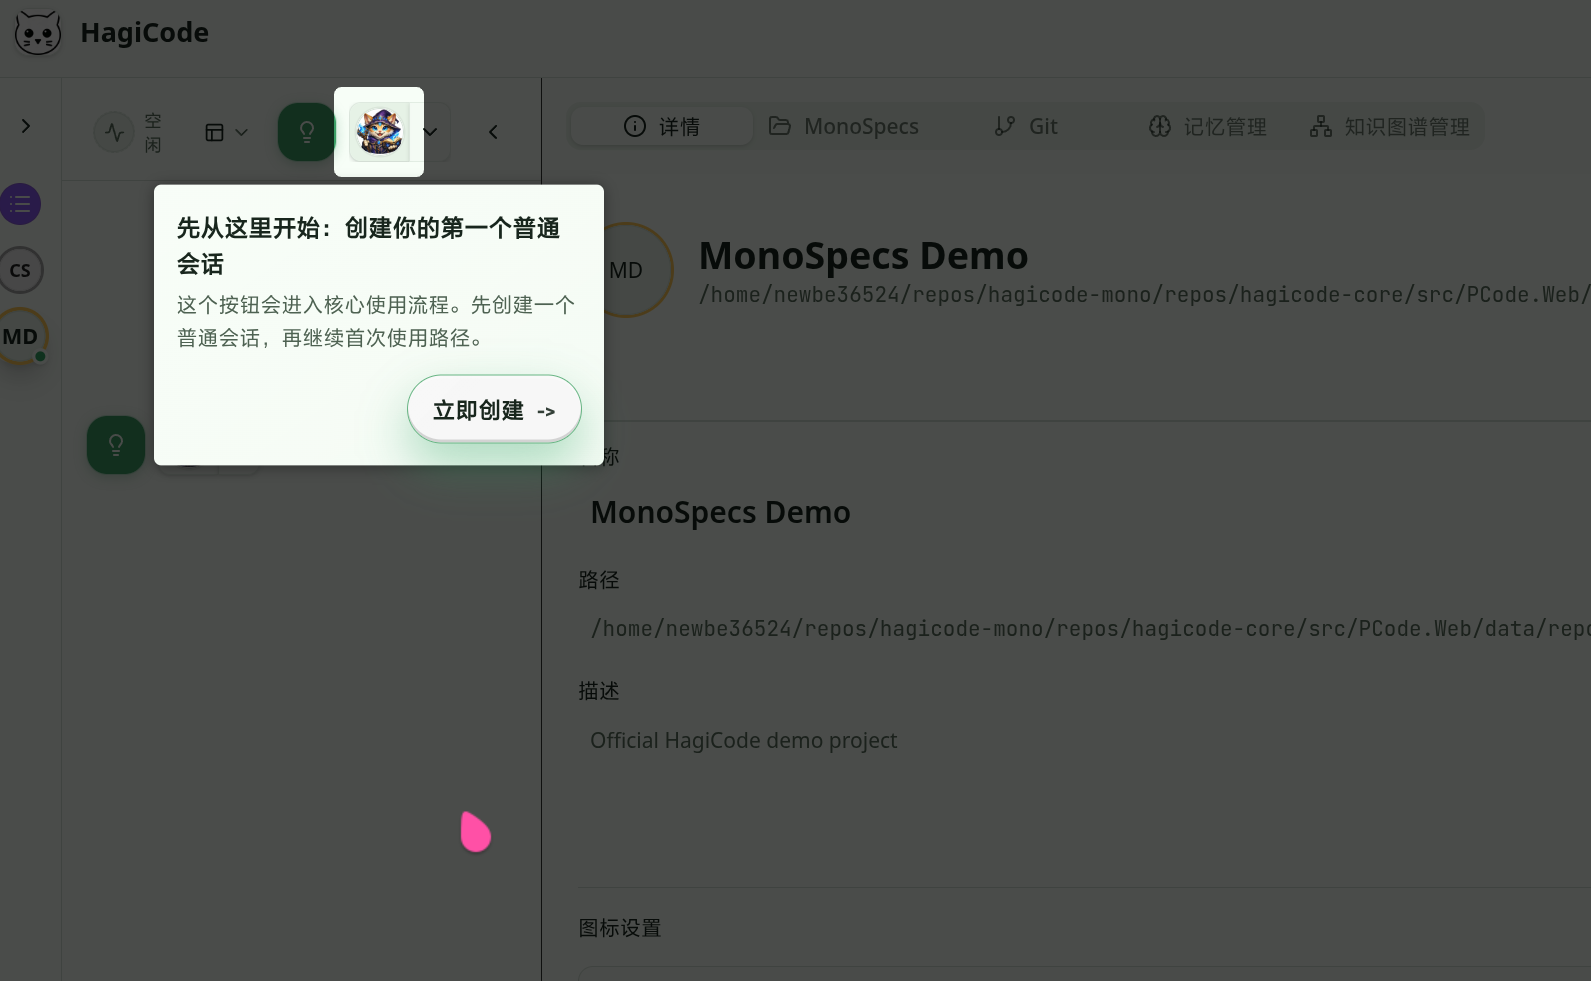
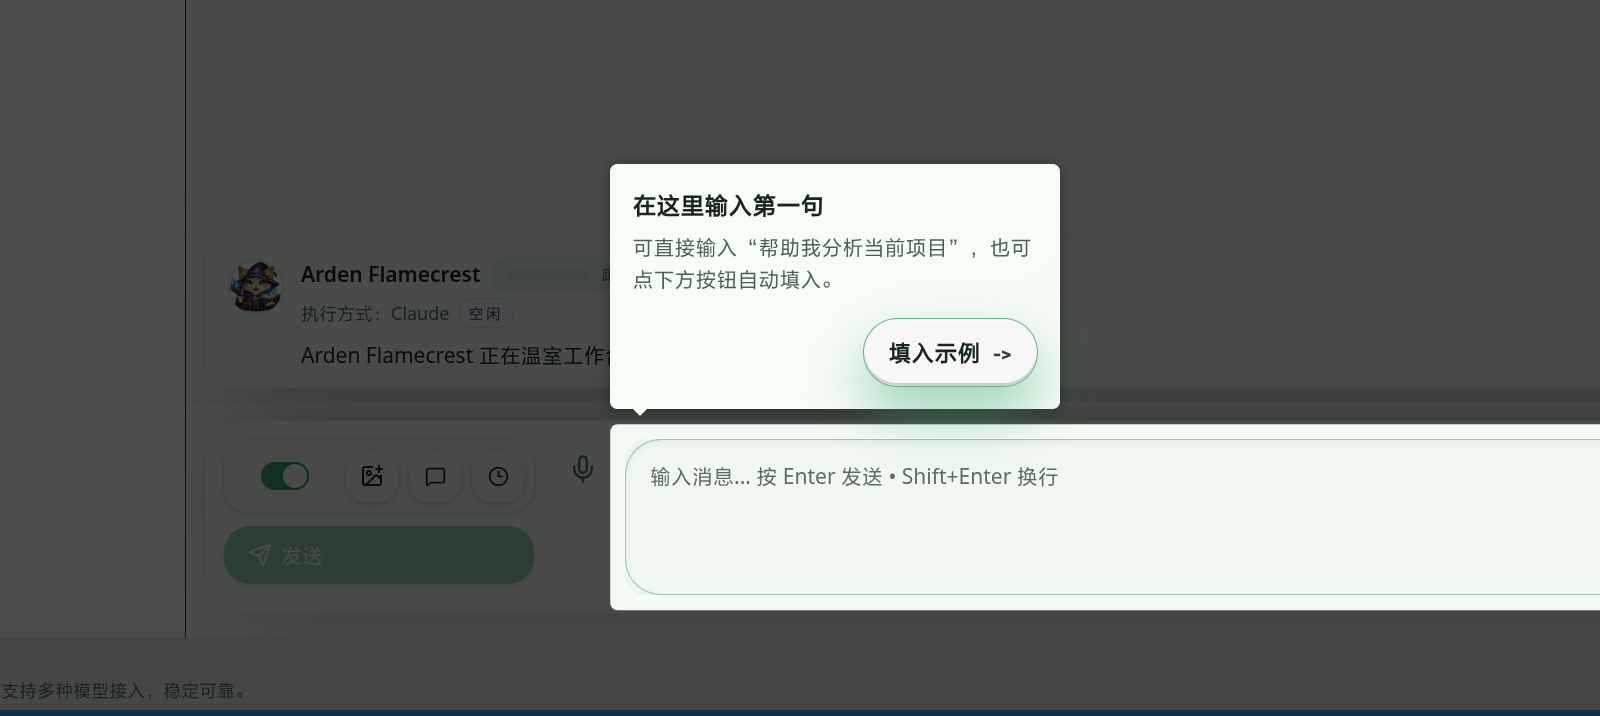
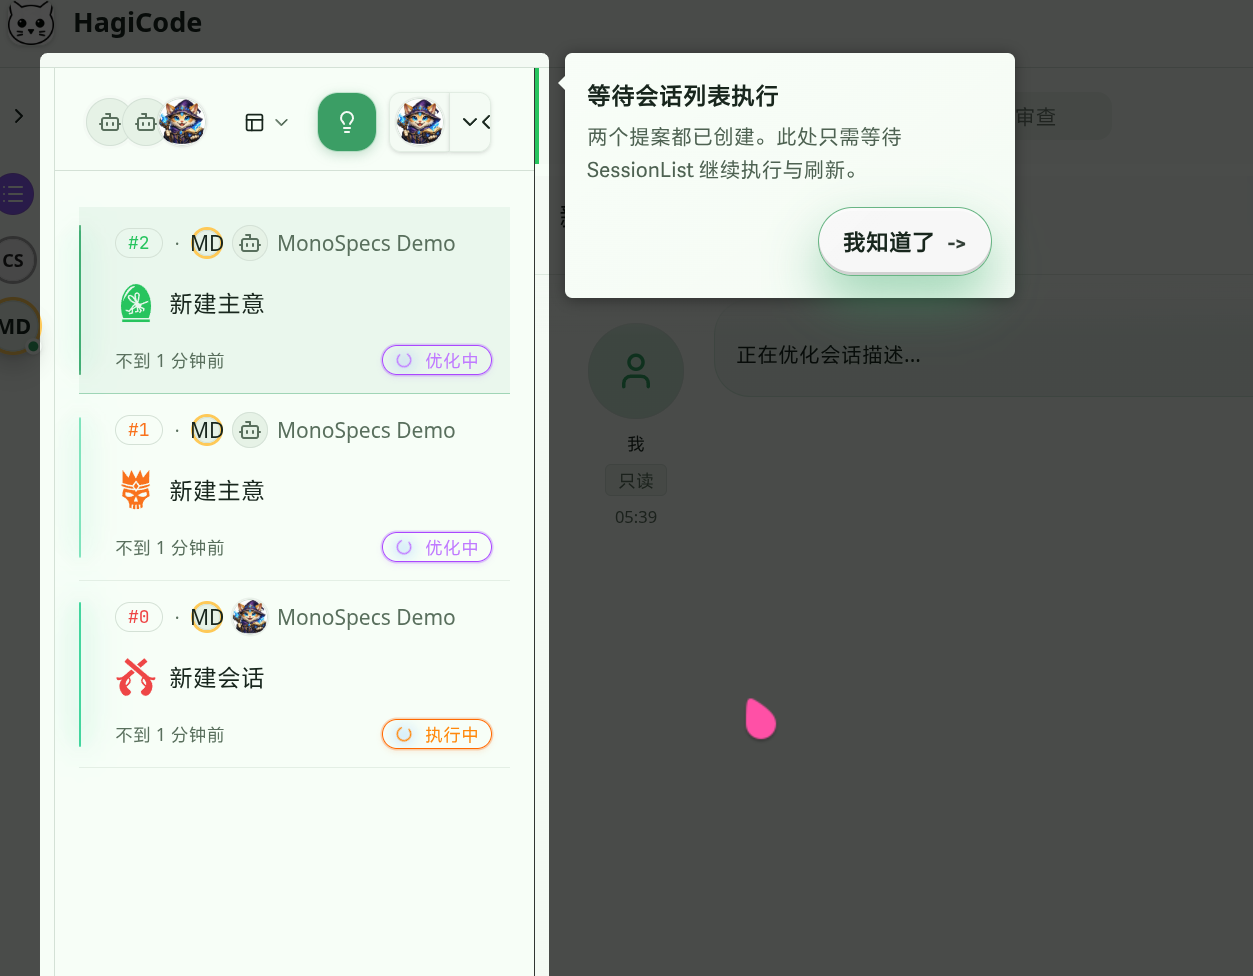
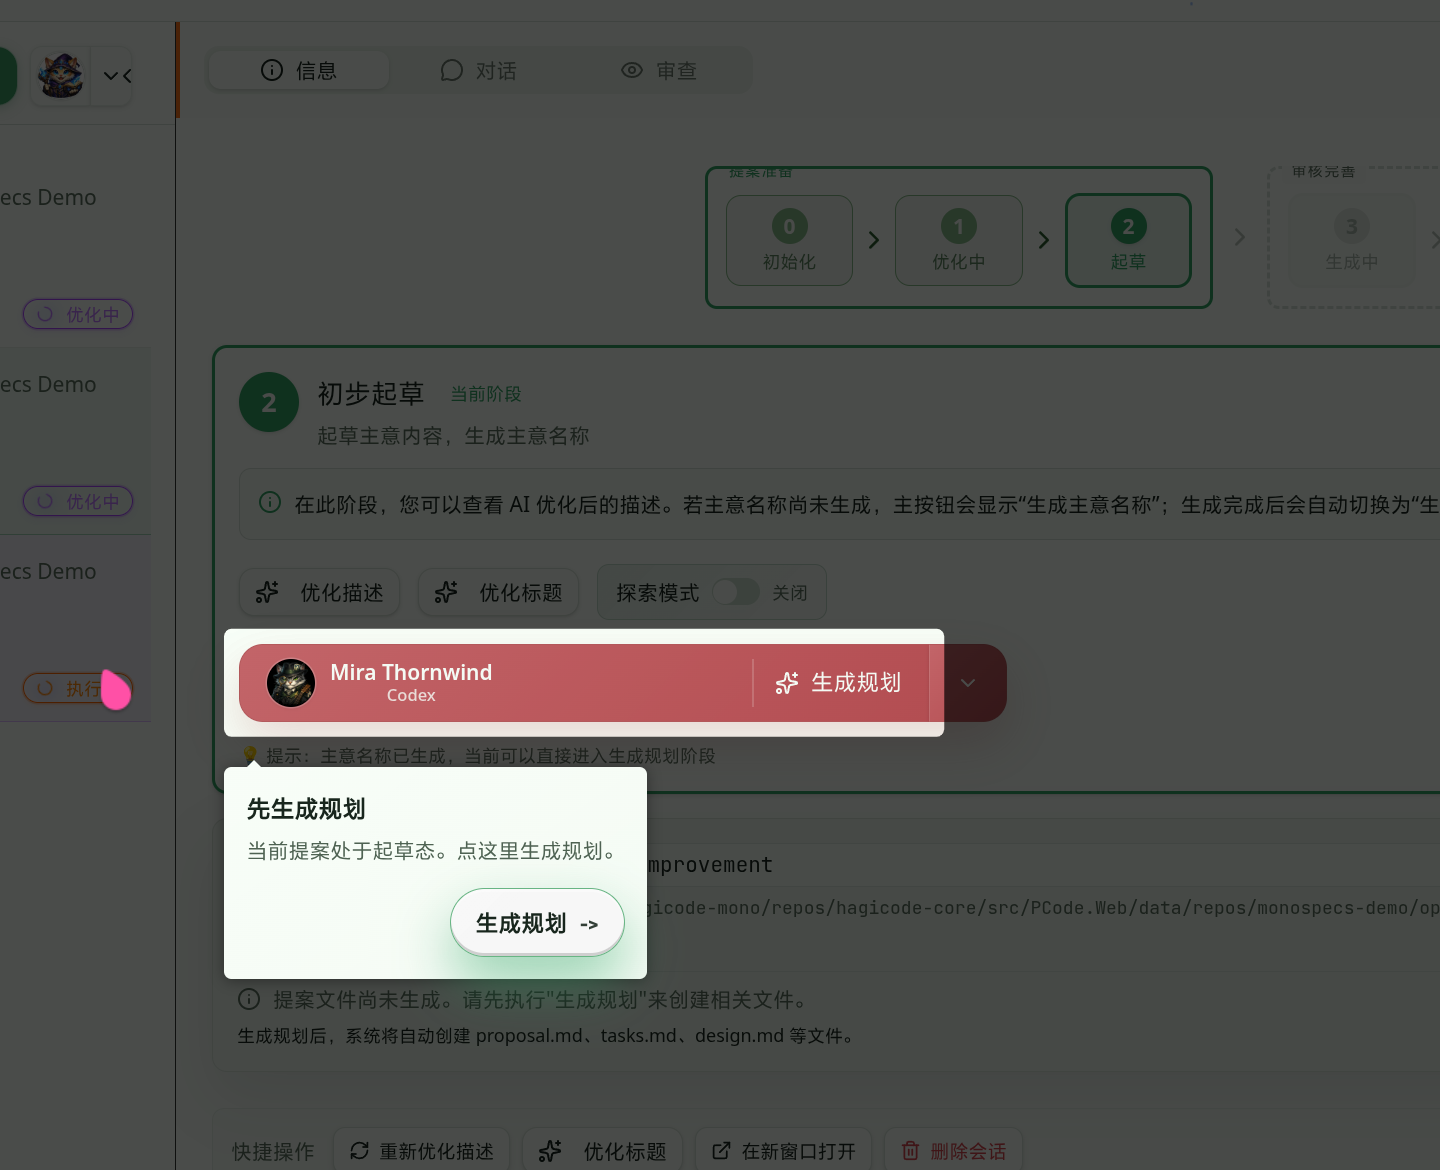
4. Progressive wizard: split complex tasks into small steps
Section titled “4. Progressive wizard: split complex tasks into small steps”For complex tasks, such as first-time installation and configuration, we use a multi-step wizard design. Each step requests only the necessary information and provides clear progress indicators. Large tasks become much more manageable when handled one step at a time.
The wizard state model:
interface WizardState {  currentStep: number;           // 0-3, corresponding to 4 steps  steps: WizardStep[];  canGoNext: boolean;  canGoBack: boolean;  isLoading: boolean;  error: string | null;}
interface WizardStep {  id: number;  title: string;  description: string;  completed: boolean;}
// Step navigation logicconst goToNextStep = () => {  if (wizardState.currentStep < wizardState.steps.length - 1) {    // Validate input for the current step    if (validateCurrentStep()) {      wizardState.currentStep++;      wizardState.steps[wizardState.currentStep - 1].completed = true;    }  }};
const goToPreviousStep = () => {  if (wizardState.currentStep > 0) {    wizardState.currentStep--;  }};
Each step has its own validation logic, and completed steps receive clear visual markers. Canceling opens a confirmation dialog to prevent users from losing progress through accidental actions.
Conclusion
Section titled “Conclusion”Looking back at HagiCode’s progressive disclosure practice, we can summarize several core principles:
- Step-by-step guidance: break complex tasks into smaller steps and request only the necessary information at each stage
- Intelligent completion: use historical context and project knowledge to fill in information automatically
- Instant feedback: give every action clear visual feedback and status hints
- Fault-tolerance mechanisms: allow users to undo and reset so mistakes do not lead to irreversible loss
- Input diversity: support multiple input methods such as text and voice
In HagiCode, the practical result of this approach was clear: the average length of user input increased from fewer than 20 characters to structured descriptions of 200-300 characters, the quality of AI-generated proposals improved significantly, and user satisfaction increased along with it.
This is not surprising. The more information users provide, the more accurately the AI can understand them, and the better the results it can return. In that sense, it is not very different from communication between people.
If you are also building AI-related products, I hope these experiences offer some useful inspiration. Remember: users do not necessarily refuse to provide information. More often, the product has not yet asked the right questions in the right way. The core of progressive disclosure is finding the best timing and form for those questions.
References
Section titled “References”- HagiCode project: github.com/HagiCode-org/site
- HagiCode official website: hagicode.com
- Progressive disclosure design principle: Wikipedia - Progressive Disclosure
- Handlebars template engine: handlebarsjs.com
If this article helped you, feel free to give us a Star on GitHub and follow the continued development of the HagiCode project. Public beta has already started, and you can experience the full feature set right now by installing it:
- GitHub: github.com/HagiCode-org/site
- Official website: hagicode.com
- Watch the 30-minute hands-on demo: www.bilibili.com/video/BV1pirZBuEzq/
- One-click installation with Docker Compose: docs.hagicode.com/installation/docker-compose
- Quick installation for the Desktop app: hagicode.com/desktop/
Copyright Notice
Section titled “Copyright Notice”Thank you for reading. If you found this article useful, feel free to like, save, and share it. This content was created with AI-assisted collaboration, and the final content was reviewed and confirmed by the author.
- Author: newbe36524
- Original link: https://docs.hagicode.com/blog/2026-04-05-progressive-disclosure-hci/
- Copyright notice: Unless otherwise stated, all articles on this blog are licensed under BY-NC-SA. Please cite the source when reprinting.